
|
start | menu | cc | MIDI sync master | tape sync master
I want
I want to slave my D3200 to a sequencer, so the D3200 will stay in time with the sequencer clock.
Solution
I can't. I thought very long and hard about that. The D3200 can only be the master.
BUT
Luckily the D3200 has a very accurate MIDI sequencer built in.
You want, however
You want to synchronize your sequencers to a Song in the D3200. But you only have a Wave file of the song and no Clock track.
What you will have to do
You need to create a Clock track, so you can synchronize all of your gear to the Song.
Hardware you need
- the MIDI Clock Track in the Korg D3200
- Computer with Wave editing software to create a "beep" track
- External signal-to-trigger converter circuit
In short
You have a Wave file, and you need to create a MIDI Clock track, so all of your sequencers will play along with the Wave file effortlessly. Unfortunately, the D3200 does not have a BPM analyzer, so the only way the D3200 can create an accurate MIDI Clock Track, is by tapping the beat with your finger on the PLAY button, while the D3200 plays back the Wave file. The D3200 will record your timing very accurately and save it to the internal MIDI Clock track. You can also use your feet by tapping a FOOT pedal that is connected to the FOOT SWITCH jack of the D3200. However, when you are not a drummer, this is very difficult and frustrating. To make things worse, the D3200 offers no way to micro-edit the mistakes after you have finished. Well actually you can edit the timings for each bar, but this process will totally mess up the remainig timings of the song. When your timing is off, you can only try again from the beginning of the song.
![]() A much more reliable way would be, that you manually create a second Wave file on your PC, that contains audible Beeps on every beat or bar of the song. By using a signal-to-trigger circuit, the beeps can then be used to generate a 5 Volts foot pedal signal on every beat, in stead of tapping a foot pedal in time with your feet. This way of creating a clock sync track is very accurate. The whole process is relatively easy.
A much more reliable way would be, that you manually create a second Wave file on your PC, that contains audible Beeps on every beat or bar of the song. By using a signal-to-trigger circuit, the beeps can then be used to generate a 5 Volts foot pedal signal on every beat, in stead of tapping a foot pedal in time with your feet. This way of creating a clock sync track is very accurate. The whole process is relatively easy.
Sound-to-trigger
These circuits can be found on some old synths and some new modular circuits. You need a trigger that sends 5 Volts.
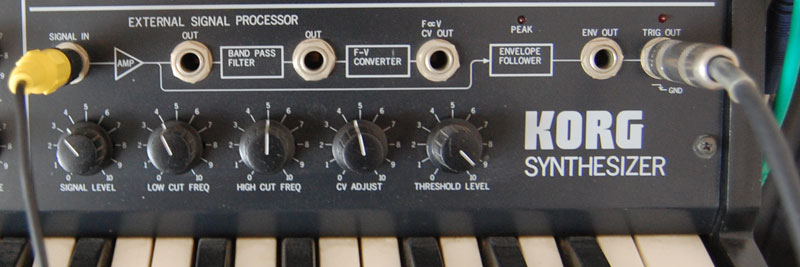
The Korg MS-20 has one:
Korg also sold this circuit as a separate module called the MS-03 (rare).
Other possibilities (from cheap to expensive):
- Korg Littlebits sells an "i20 Sound Trigger", that can be put to use when you desolder the microphone and feed the Beep signal directly into the circuit.
- the Doepfer A-119 Envelope Follower converts audio to a Gate signal
- the Doepfer A-168-1 PWM module converts audio to a Gate signal
- the XAOC Devices 'Sewastopol' generates a Trigger Out from an audio signal
- the SPUTNIK EF/PREAMP also converts audio to a 5 Volts Pulse signal
- the ARP2600 has a trigger-out that listens to any input (sorry for mentioning).
- the (also rare) KORG MS-02 has 2 Trigger Processors
Gate and Trigger (and Pulse) circuits produce a signal between 5 and 10 Volts (MC202, TB303).
-
Trigger is always a short pulse,
-
Gate is a pulse that has the same duration as the audio signal.
So for short audio Beeps, with Gate and Trigger signals you can accomplish exactly the same thing.
I tried a few "poor man's solutions" that did not work.
Step by step
1. Create a Wave file with a Beep on every beat
Start up the computer and load the original song file into your Wave Editor Software (I use Cooledit / Adobe Audition).
If you have the luxury of having an isolated drum track, use the drum track only.
Make sure the song starts on the first beat, no trailing silence, because the D3200 can not create MIDI Clock data halfway of a beat.
Create all the Markers ("Cue points") manually, exactly at the start of each beat (see figure 1).
Save the song. Use a filename with a maximum of 8 characters (D3200 standard).
Create a sound file containing just a loud sawtooth-beep of 0,1 seconds (see figure 2).
- Menu: File > New; Generate > Tones > dB Volume: L 0, R 0, Duration: 0.1 seconds
Next, set all of the wave data in the Marker-file to silence, so only the markers remain in a file with no sound
- In Cooledit/Audition: Ctrl-A (select entire wave), Menu: Effects > Amplitude > Amplify/Fade, Constant Amplification: 0%
Copy + Mix Paste (Ctrl-Shift-V) the beep at every marker. Use "Mix Paste" so no extra Paste-insert time is created (see figure 3).
- Make sure that: Edit > Snapping > Snap to Cues is ON
Save the file with the beeps on every marker/cue to a different file name (max 8 characters for the file name).
Now you have 2 files: the original (trimmed) song Wave file and a second Wave file with just a beep at every beat.
Both files have exactly the same length, filesize, bitrate and sample depth, which is very important for the success factor of this project.
Figure 1
Figure 2
Figure 3
2. Prepare the D3200
Using the USB-Mode of the D3200, transport all of the wave data that make up the song, including the file with the Beeps. Make sure you use the song version that has no silence before the first beat. Also, 32bit wave files won't show up on the screen of the D3200. Convert to 16bit first before transporting to the D3200.
Create the Song in the D3200 and import all of the Waves into unused Tracks using the Track > Import function of the D3200.
Switch off "Song Protection".
a) When finished, listen to the Beep track along with the song. It should stay in sync until the end of the song.
b) Isolate the Beep track
Now turn the fader of the Beep track to zero, and send that Track to a clean output with no other sound, e.g. to AUX1.
Press SEND > Aux1Send and turn the volume of the Beep track up to 100. Also make sure the main Aux1-level is set to 100.
c) Connect the Aux1 output of the D3200 to the SIGNAL IN of your Sound-to-trigger converter.
Switch on the Sound-to-trigger converter.
d) Connect the TRIGGER OUT of your converter to the D3200 FOOT PEDAL.
Now check the correct polarity of the Trigger Out signal:
- go to SYSTEM/MIDI > Control
- PLAY the song
- 1. the LED above the TRIG OUT on the Korg MS20 lights up when the 5 Volts Trigger signal is sent
- 2. the Foot icon next to the Polarity setting should light up when the Trigger signal is received. If not, switch Polarity
Go to the MIDI/MMC tab and set the D3200 to MIDIClockMaster
e) The creation of a MIDI Clock track is part of the SESSION DRUMS function of the D3200. It will not eat up an extra Track.
You need to tell the D3200:
- the amount of Measures the song consists of
-
the Time Signature of the song
Open the fader of the DRUMS track (the grey fader).
Press SESSION DRUMS.
 "SessionDr" tab:
Select "Pat&T" as RecMode, because you will then be able to set the Drum Pattern you like on the PatternMap. Make sure that the "Click Monitor" button is not pressed.
- pressed: you hear the drum settings from the "SessionDr" tab.
- not pressed:
you hear the drum settings from the "PatternMap" tab. We want that.
Please ignore the other settings on the SessionDr tab.
 "DrmsMixer" tab.
To be able to check if the MIDI Clock is correctly recorded, you will want to hear the Session Drum sound as a guideline. Assign the drum sound to the Master or Monitor output, whichever output your speakers are connected to.
 "PatternMap" tab:
The MIDI Clock will be recorded in one Pattern for the whole song. All the miniscule BPM changes for every Measure (especially important when you have recorded a live drummer) will be saved in the Pattern. Unfortunately, the D3200 does not have any function to micro-edit the Clock Timings of a Pattern afterwards, so we are not going to care about it. Our Beep track takes care of this. In the Pattern Map you define:
- the amount of Measures the Song consists of.
-
the Time signature of the song
There is already a standard Pattern defined, which you are going to change:
- select the Pattern and click Edit
 The "Edit Map Event" screen opens and the current Drum Kit will sound.
- set the Length of the Pattern (make it long), which represents the amount of Measures for this song
- set the GROUP to "Metronome", because the Metronome enables you to set a different Time Signature (e.g. 7/8)
- set the Time Signature with the SESS and BEAT knob
- you do not need to adjust the TEMPO knob, because the Beep track will take care of this.
It is possible to edit the Group, Session and Beat settings later, however do not change the Measure Length and do not turn the TEMPO knob afterwards. This will destroy your recorded MIDI Clock.
3. Go record the MIDI Clock track
 "TempoTrk" tab: Here you start recording of the Tempo from the Trigger, generated by the Beep Track.
- select MeasTap
- click RecStart to arm Tempo recording. The D3200 will automatically rewind to the start of the Song.
- detonate the recording by pressing the Play-button (the D3200 waits for the first "tap", you have to generate it yourself).
After this, do not touch the Play button again.
If the D3200 stops after a few seconds and tells you that
the Tempo is:
- too fast, you need to edit the Beep track in your computer, remove every 2nd Beep and try again (Mix Paste silence!).
- too slow, you also may need to edit the Beep track and put in extra beeps, or you might want to check your cables, because it is possible that the Trigger signal is not received by the D3200 for some reason.
After the last Measure (according to the length-setting) is done, or when you press Cancel, the D3200 will stop recording of the Tempo and your MIDI Clock Timing is part of the PatternMap. If there are remaining Measures in the Pattern, they will receive the same BPM as the last recorded BPM. Which is very handy for a beat flywheel function.
4. Adjust the Beep Track Delay
This you have to do only once and make a note for the next time you are going to create a MIDI Clock Beep Track.
- open the faders of beep track and the drum track.
- rewind and play back the Song, so you will only hear the Beep and the Drums.
- listen carefully if you hear any delay between the Beep and the Drum. You probably will.
If the delay is noticable, you need to edit the Beep track in the computer.
- first make a live recording of a few seconds with a sound recorder and transport the wave file to the pc.
- open the wave file in your wave editing software
- measure the delay between the beep and the drums (in milliseconds) and write it down.
In my case, the delay between the Beep (highlighted) and the Drums (peak) was 0.015 seconds, see below. Which was noticable.
This means, you have to delete 0.015 seconds from the beginning of the original Beep Wave file. Then all of the Beeps will sound 0.015 seconds earlier, and the drum sound will be exactly spot on, on the Beat.
5. Create the final MIDI Clock Track
Save the new Beep wave file and transport it to the D3200. Import the Beep Wave into a Track and record the MIDI Clock again with this new Beep track.
Done!
Advantages
Now you are able to...
...use the D3200 as a MIDI Master and connect MIDI OUT to your sequencers. If you have a MIDI-to-DIN Sync converter, you can also synchronize the sequencers from vintage Roland machines, like the TB303 or the TR808.
...show the Time in "Measures/Beats". Go to the Song page, click the clock in the upper left corner of the screen and select "Meas:Beat:Tick".
...jump to a Measure in your song.
Screenshots of the D3200 made with the 2Seemy-interface.
BONUS MATERIAL
Example for 7/4 beat Songs for Roland x0x gear:
-
7/4 beat is 14 steps in the Roland x0x sequencer
To test your results:
- hook up MIDI equipment or a MIDI to DIN converter to the MIDI OUT of the D3200
- program 14 steps in the x0x sequencer
- set the x0x sequencer in slave mode
- arm the x0x sequencer by hitting start
- hit PLAY on the D3200
Convert to DIN sync and to tape sync
To convert to DIN sync
-
buy a MIDI to DIN sync box from DOEPFER (around 60 euros).
To convert to tape sync (FSK):
You can also buy a MIDI to tape sync box, but they are very rare, and also, they probably create differtent kinds of tape sync signals, some of which are not recognized by, say, Roland x0x machines. Better use the tape sync signal from a machine you are actually going to use as a slave.
Some other solutions:
- the MC-202 outputs tape and DIN sync when slaved to DIN sync.
- the TR-707/TR-727 outputs MIDI sync and DIN sync, when slaved to tape sync. It outputs nothing when slaved to MIDI or DIN.
- for MIDI/DIN sync conversion you could also hunt for an old Roland SBX10, Roland SBX80 or the Roland AIRA sync box SBX1 (around 400 euros).
- tape sync you usually only find on old drum machines, well heck and the MC-202.
Some Roland units and their sync possibillities
| class | unit | MIDI | DIN | FSK | comment |
| SEQ | MC-202 | + | + | when slaved to DIN: sends DIN and FSK | |
| SEQ | SBX10 SBX80 |
+ | + | ||
| SEQ | MC-50 MC-300 MC-500 |
+ | + | ||
| SEQ | MSQ-700 | + | + | + | and DCB (for the Jupiter 8 JP8A and Juno 60) |
| DRUM | TR-505 TR-626 |
+ | + | ||
| DRUM | TR-707 TR-727 |
+ | + | + | when slaved to DIN or MIDI: sends nothing when slaved to FSK: sends DIN and MIDI |
| DRUM | TR-909 | + | + | + | DIN SYNC: only input |
The TB-303, TR-606 and TR-808 only have DIN sync. The SH-101 has none of the above.