
|
Hardware | Concepts | Quickstart | Menu structure | Software
PCtoS550 - How does it work?
The software dumps a Wave file (*.wav) from your PC to the S-330 memory using
the MIDI connection between your PC and the S-330. This is handy because this
way, the samples can be transferred lossless. This software can also help you,
in case the diskette drive in the S-330 is broken.
- the description can be found on Hitsquad,
- youcould download the software from Reocities
(because Geocities has been discontinued), but now it's here.
PCtoS550 only copies Wave Data to the S-330 memory, not Tone Paramters or Patch Parameters. To be able to do that, you need another software, like Sound Manager for S330.
Quick manual for PCtoS550
Here's the screen, the options are a bit scattered around the screen and the color scheme is horrible, so take a close look:
Step 1 - PC:
- convert the sample to 16 bits, mono, 30.000 Hz or you will get unwanted pitches
Step 2 - S-330:
- MODE > MIDI > Message
- Exclusive: On
- Device ID: 1
Step 3 - PCtoS550:
Files section:
- first: click "Source" and select your Wave File
MIDI Out Options:
- select correct "MIDI Out Port"
- no need to change the Delay
Convert to section
- Convert to: MIDI
MIDI Thru section:
- for the MIDI Keyboard: select correct "MIDI In Port" (so you can play the sound)
To be able to fill the "Target section" correctly, read the next step:
Step 4 - "Segment Top"
With this option, you select the physical memory location to where the Wave Data is saved.
First, check how many segments you need for the Wave file:
- the number of segments is shown right below the file name in PCtoS550
Second, check the S-330 Memory Banks if there are this many adjacent free segments:
-
go to MODE > EDIT > Disp Wave
- change Memory Banks by clicking COM > "Bank A" or "Bank B"
![]()
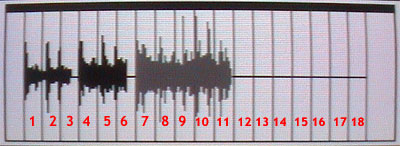
Here: Bank A shows enough free segments: seven free segments starting from segment number 12, which will be your Segment Top number. Count carefully, if you choose segment 11 as a starting point, existing Wave Data will be destroyed. The 3 samples you see were actually uploaded using PCtoS550. When working with the S330 menu's, you don't need to think about all this segment stuff. The S-330 does this kind of memory management completely behind your back.
Now you can select the correct Segment Top in PCtoS550:
And fill in the remaining options:
- Device ID: 1 (same ID as in Step 2)
- Wave Bank: IA (=Bank A) or IB (=Bank B), there are no IIA and IIB Banks in the S-330
- Segment Top: 1..18 (you just did)
- Tone assignment: Select the desired I11..I48 Tone number
- Playback Rate: choose 15 or 30 KHz (make it identical to your *.wav-file sample rate)
And click Convert.
- the MIDI MESSAGE LED above the POWER button should be lit the whole time during transfer.
Because of the MIDI speed limits, this takes a bit of time.
Also: leave the S-330 alone for a few seconds after the "upload", it will take some time to settle and show (and sound) the right Tone. Also, the new Wave Data is shown only after refreshing the "Disp Wave" screen. This can be done by selecting this screen again from the menu.
Still no sound? Read on.
Step 5 - S-330
- go to
MODE > EDIT > Tone PRM
- go to the Tone for the uploaded sample
- set Level: 127
The Wave length is also correct, so you do not hear the remaining empty segment slack.