|
start | overview | signal flow | workflow | screen | midi | cue levels and overdub | quick manual | repair
Preparation (setting knobs and switches to default values)
- set all of the GROUP switches to OFF to use the DIRECT mode,
- now
the input socket number, Channel number and Track number is 1 to 1.
- slide all of the Faders to 0.
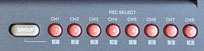
- switch off the red the Channel recording buttons beneath the screen (REC SELECT), so earlier recorded Tracks do not get overwritten.
- make sure you start at the beginning of the Track recording.
Recoring preparation of an instrument to MD Track 1
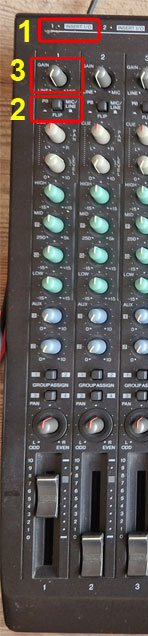
- [1] connect the instrument to Input connector 1
- [2] set the Flip switch to Mic/Line to send the input signal to the EQ, Fader and Track Recorder.
- [3] set the GAIN knob to Line for Line level audio and half way for microphones.
- later in the process we will finer adjust this knob.
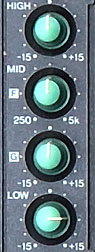
- turn all EQ settings to neutral
- set the Fader for this Channel to 7 or 8.
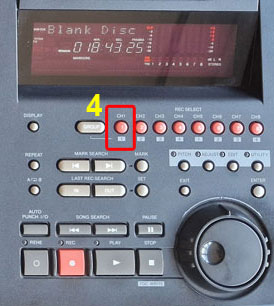
- [4] enable Track 1 for recording, by pressing the red RECORD SELECT button for Channel 1
- press the red REC button
- check the recording levels using the display meter for Channel 1.
- adjust the Gain so that the meter does not Clip.
Monitoring
- put on your headset and set the red MONITOR LEVEL knob low to protect your ears.
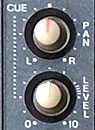
- set the Channel 1 CUE LEVEL knob to 7 or 8.
- the Cue Levels of previously recorded Channels can also be set to 7 or 8.
- put hte CUE PAN in the center.
- set the CUE MASTER half way.
- below the MONITOR SELECT print, push the red CUE button (de andere MONITOR SELECT knoppen staan uit)
- switch of all other MONITOR SELECT buttons.
- now set the MONITOR LEVEL, while listening to your headset. Or your near field monitors.
Recording levels and Monitoring set? Record!
- press PLAY
- ready?: press STOP
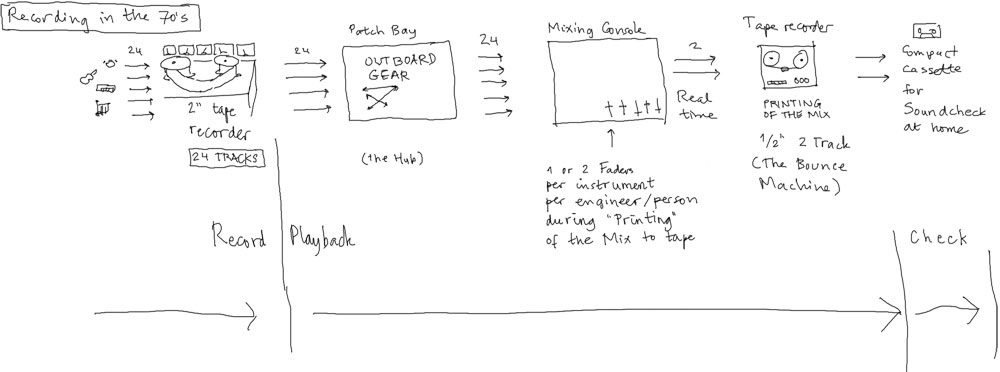
Background: Recording in the 70's
The MD8 uses a lower number of Tracks and only has 2 Effect possibilities in stead of a whole patch bay. |
DIRect mode: zet eerst alle GROUP schakelaars UIT.
De INSERT I/O input is alleen op Ch 1 en op Ch 2 geimplementeerd.
Alles hieronder uitgepeuterd dankzij bovenstaande video, Hoofdstuk 3 uit de Manual (p. 24) en heel lang staren naar het Block Diagram (zie Signal Flow).
A-1. Tracks opnemen (DIRect).
A-2. Meeluisteren tijdens opname samen met eerder opgenomen Tracks.
B. Mixdown (naar 2-sporen cassette).
![]() The "what" goes "where" into the Channel Strip.
The "what" goes "where" into the Channel Strip.
There are 2 sound sources and 2 paths:
- sources: (1) input audio (back plugs) & (2) playback MD (all MD Tracks are played back during recording!)
- paths: (1) to Channel Strip EQ and off to MD Recording, (2) to CUE path for monitoring on headphones or near fields
Verbose:
There are 2 different sound sources that come into the Channel Strip at the same time:
- the INPUT jacks on the back of the unit come into the Channel Strip,
- all Tracks on the MD that are not in "Recording mode" will play back to their own Channel Strip.
There a 2 different routes the sound source Signal can take into the Channel Strip.
- one to the EQ and the Fader and then split off simultaneously to
-
(1) the active MD Track Recorder and then back to the CUE Level of the same Channel Strip,
- (2) Stereo RCA Output (for Cassette recording) and
- (3) the External Effects AUX SEND Jack 1 and 2 with their own Level Send rotary on the Channel Strip,
- one to the CUE Level and then to the CUE Master
- which is then split to the Headphones OUT and to the Near Fields connected to the Monitor Jacks.
The FLIP switch decides which route will be taken by which signal.
- in the MIC/LINE position (up), the INPUT signal goes through the Channel Strip EQ and FADER to the Recorder and back to the CUE Level of the Channel Strip (and to (2) and (3)),
- in the PB position (down), the MD Tracks play through their own Channel Strip EQ and FADER to the Recorder (and to (2) and (3)),
- though in this scenario, the MD Recorder will never be in Recording Mode, because a Playing MD Track can not be recorded to the same Track ;)
- so this is meant to EQ and External FX each Channel during Mixdown (= recording to 2-track tape)
Only signals that pass through the Channel Strip EQ and Fader can be Recorded to an MD Track.
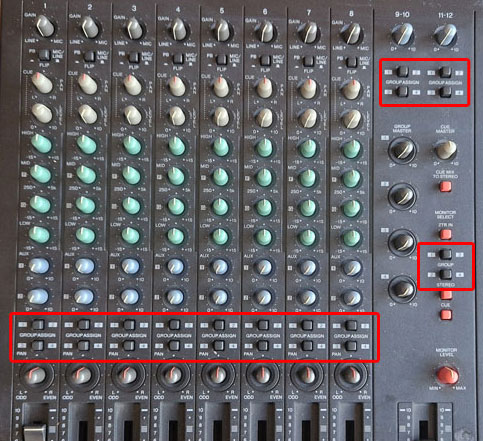
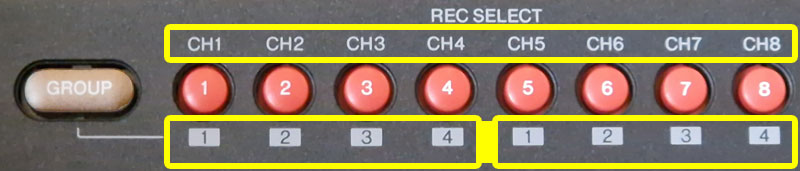
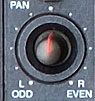
UPPER ROW = DIR select: input kanaal correspondeert direct met opnamespoor
LOWER ROW - GRP select: input kanaal wordt toegekend aan GROUP 1, 2, 3 of 4 en de GROUP wordt opgenomen op één van de vast toegekende opnamesporen.
De Inputs gaan bij de MIC/LINE instelling naar de Channel Strip Gain, EQ en Channel Fader. Daarna wordt het signaal gesplitst:
- 1.
een naar de actieve Opname Track op de MD
- 2. en een direct door naar de CUE LEVEL op zijn eigen Channel Strip. CUE eindigt in Phones Out Jack en Monitor Out RCA voor meeluisteren via Headset of Near Fields.
De Tracks die niet op opname staan, staan automatisch op Playback en lopen direct van de MD Track naar de CUE LEVEL op zijn eigen Channel Strip (zie A-2).
| INPUT 1 | 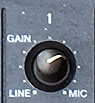 |
FLIP to MIC/LINE |
 |
(INSERT I/O) | 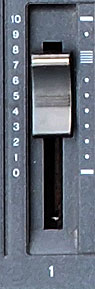 |
DIR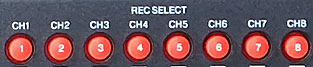 |
 |
||||||||
 |
... zie A-2 voor vervolg |
Alle Tracks die niet op Recording staan, die staan op Playback.
Deze Playback Tracks gaan in de MIC/LINE instelling altijd via het CUE pad van hun eigen Channel strip:
- naar de PHONES OUT JACK voor de Headphone,
- en naar de MONITOR OUT RCA voor de Near Fields.
| Recording flow and Playback TO CHANNEL CUE |
|
 |
MONITOR SELECT  |
 |
PHONES OUT JACK MONITOR OUT RCA |
Stuur alle Tracks naar de STEREO OUT RCA en verbind het cassettedeck met deze uitgang, als volgt:
Voor elke Channel Strip:
- zet alle 8 FLIP schakelaars op PB.
- de 8 MD Playback Tracks flow gaat dan via elke Channel EQ - (INSERT I/O) - Channel Fader - Pan - Stereo Fader - Stereo OUT RCA.
Voor Monitoring van het signaal op de Phones en de Near Fields:
Onder MONITOR SELECT:
- zet CUE uit
- zet STEREO aan
- en zet MONITOR LEVEL op halverwege
Signal Flow
|
FLIP to PB |
|
(INSERT I/O) | |
 |
AUX SEND 1 RCA AUX SEND 2 RCA |
EXT FX EXT FX |
LINE INPUT 9, 11 LINE INPUT 10, 12 |
WET FX SIGNAL |
 |
STEREO OUT RCA |  |
2TR IN RCA |  |
|
PHONES OUT JACK MONITOR OUT RCA |
|||||||||||||
 |
|||||||||||||||||||||||||||||
| Channel | Channel | Channel | Channel | Channel | Stereo Bus | Monitor | Monitor | Monitor |