
|
index | Menu | Algorithms | Wave forms | Editors: TX81Z programmer, YSEDITOR
 The YSEDITOR software supports lots of the Yamaha 4-operator synths. Currently the DX100, DX27(S), DX21, TX81Z, DX11, WT11, YS100, YS200, B200, TQ5, DS55 and V50. The software runs on the Atari ST, so for the PC, you need an Atari ST emulator first. To save myself from sorting everything out ever again, I described the steps of getting it all working. So here we go.
Connect your TQ5 to both the MIDI IN and OUT ports of the PC, whether an USB-MIDI connector, or onboard.
Preparation
Create a folder "STEem disks" in a convenient location (my documents, or D-drive).
Create a folder "hard disk" inside the "STEem disks" folder.
YSEDIT
Read the instructions on the YSEDITOR webpage of m.tarenskeen.
Download the YSEDITOR.
Move the YSEDITOR folder to the "hard disk" folder.
Atari ST emulator
Download the "STEem" engine, an Atari ST emulator for the PC, and TOS (The Operating System).
TOS version 1.xx and 2.xx will work with the STEem emulator. I work with v2.06.
STEem: http://steem.atari.st/lang.htm
TOS: https://avtandil.narod.ru/tose.html (see the "TOS 2.06 Images")
Unpack (unzip) "steem_v3_2.zip" into its own folder and move the folder to C:\Program Files\
Unpack TOS ".img-file" into a TOS/ folder. Move the folder to the C:\Program Files\ STEem folder.
Run "steem.exe" from "C:\Program Files\Steem-v32-tos\". The program detects that you run the software for the first time and asks you some questions first:
- system: select "Tos206.img" from the TOS-folder.
- disks: select the "STEem disks" folder you created.
- harddisk C: select the "hard disk" folder from your "STEem disks" folder.
- harddisk D: (skip).
Before booting the Atari ST system, setup the MIDI ports and screen resolution:
- click the spanner (Options)![]()
> Machine: set Monitor to "Monochrome (High Resolution)".
- YSEDITOR only works in black & white mode, hence the monochrome setting.
- High Resolution = 640x480, which is the height&width of the YSEDITOR interface.
> Ports: choose the PC hardware MIDI IN and OUT port you want to use.
- all your MIDI ports are listed here, choose the right one.
Start YSEDITOR from within the STEem emulator
![]()
Press the yellow Play-button. The Atari ST will boot, this takes a minute or so.
- to break out of STEem: press the "Pause/Break"-key on your keyboard.
![]() Double click the "HARD DISK" icon (this points to your "STEem disks" folder!)
Double click the "HARD DISK" icon (this points to your "STEem disks" folder!)
![]() Double click the "YSEDT2_8" folder.
Double click the "YSEDT2_8" folder.
![]() Double click the "YSEDT2_8.PRG" icon: YSEDITOR starts.
Double click the "YSEDT2_8.PRG" icon: YSEDITOR starts.
On starting, YSEDITOR will immediately start probing the MIDI port for your Yamaha unit. When it does not find anything, it tells you that the synthesizer is not responding. Troubleshooting: in case of an USB-MIDI connector, check if the IN/OUT leds are flashing. If not, you chose the wrong MIDI port in the STEem options (spanner button). Also check that the PC MIDI OUT is connected to the Yamaha MIDI IN and vice versa (duh).
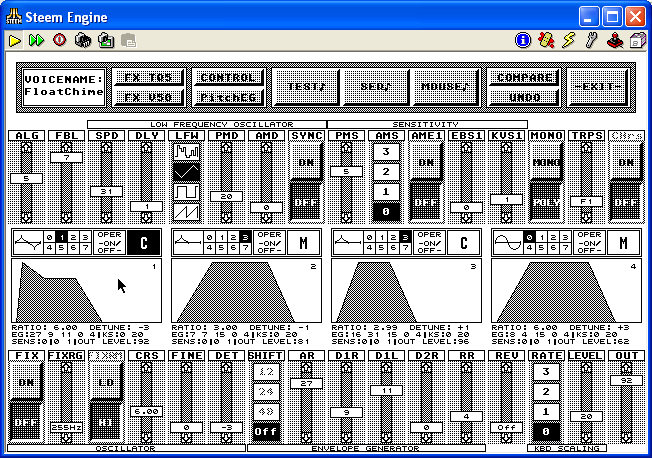
The program starts in the BANK MANAGER screen.
- click SYNTH SELECT to select another Yamaha 4-op synthesizer.
- click the HELP button to get started (or read "HELP.TXT" in the YSEDT2_8 folder with Windows Notepad).
- click RECEIVE to load the edit buffer of the TQ5.
Here, patch no. 25 'FloatChime' is loaded into the editor.
If you want more infos about the Atari ST community, please go to their forum:
http://www.atari-forum.com/viewforum.php?f=5
DX11 Voice Memo Chart
YSEDITOR shows the 3 or 4 letter abbreviations of the settings. Luckily YSEDITOR also has a great feature builtin: if you click/hold your Right Mousebutton on the abbreviated title of each slider, a written out parameter name will appear as a popup.
Holding your Right Mousebutton on top of the ALG(orithm) slider gives a graphical choice of the 8 Algorithms.
The developer of YSEDITOR was so kind to point this out. Thank you!
The manual of the TQ5 states, on page 106, that the TQ5 uses most of the parameters of the DX11, so when you open the User Manual of the DX11, you see on page 31 the Voice Memo Chart with all the DX11 parameters, combined into different categories. Turns out, the programmer of YSEDITOR used the same categories for the Atari program. See chart below:
| Yamaha DX11 Voice Data Chart | YSEDIT | Explanation | |||||
| Operator | 1 | 2 | 3 | 4 | Click Operator Block | ||
| Algorithm Select | ALG | ||||||
| Feedback level | FBL | set Feedback Level of Operator 4 | |||||
| LFO | Wave | LFW | Low Frequency Osc Wave Form | ||||
| Speed | SPD | ||||||
| Delay | DLY | ||||||
| Sync | SYNC | LFO Synchronize on/off | |||||
| P Mod Depth | PMD | Pitch Modulation Depth | |||||
| A Mod Depth | AMD | Amplitude Modulation Depth | |||||
| Sensitivity | P Mod Sens | PMS | Pitch Modulation Sense | ||||
| A Mod Sens | AMS | Amplitude Modulation Sense | |||||
| AME1, AME2, AME3, AME4 | Amplitude Modulation Sense Per Operator (On, Off) |
||||||
| EG Bias Sens | EBS1, EBS2, EBS3, EBS4 | Envelope Genrator Bias Sense Per Operator |
|||||
| Key Velocity | KVS1, KVS2, KVS3, KVS4 | Key Velocity Per Operator |
|||||
| Oscillator | Mode | FIX | Ratio/Fixed Mode (On, Off) | ||||
| Fix Range | FIXRG | Fixed Frequency Range (in Hertz) | |||||
| Frequency | CRS, FINE | Coarse Frequency, Fine Frequency | |||||
| Waveform | 0, 1, 2, 3, 4, 5, 6, 7 | ||||||
| Detune | DET | ||||||
| Envelope Generator | AR | AR | Attack Rate | ||||
| D1R | D1R | Decay 1 Rate | |||||
| D2R | D2R | Decay 2 Rate | |||||
| RR | RR | Release Rate | |||||
| D1L | D1L | Decay 1 Level | |||||
| Shift | SHIFT | EG Shift - Off / 12 / 24 / 48 | |||||
| Pitch Envelope Generator | PR1 | ||||||
| PR2 | |||||||
| PR3 | |||||||
| PL1 | |||||||
| PL2 | |||||||
| PL3 | |||||||
| Output Level | |||||||
| Keyboard Scaling | RS | ||||||
| LS | |||||||
| Transpose | TRPS | ||||||
| YSEDIT | Explanation | |||
| Voice name | ||||
| Poly / Mono mode | Monophonic / Polyphonic | |||
| Pitch Bend Range | ||||
| Portamento | Mode | |||
| Time | ||||
| Foot SW Assign | ||||
| Foot Control | Volume | |||
| Pitch | ||||
| Amplitude | ||||
| Modulation Wheel | Pitch | |||
| Amplitude | ||||
| Breath Control | Pitch | |||
| Amplitude | ||||
| Pitch Bias | ||||
| EG Bias | ||||
| After Touch | Pitch | |||
| Amplitude | ||||
| Pitch Bias | ||||
| EG Bias | ||||
| Reverb Rate | ||||
2019 february - making changes to this page, not finished yet.
YSEDITOR
| Group- | Setting | Explanation | Remark |
| ALG |
select the ALGorithm Number | see Chart | |
| FBL | set Feedback Level of Operator 4 | ||
| LOW FREQUENCY OSCILLATORS | SPD |
Speed | |
| DLY | Delay | ||
| LFW | Low Frequency Wave Form, select one of the 4 waves |
||
| PMD | Pitch Modulation Depth | ||
| AMD | Amplitude Modulation Depth | ||
| SYNC | on/off | ||
| SENSITIVITY | PMS | Pitch Modulation Sense | |
| AMS | Amplitude Modulation Sense 0, 1, 2, 3 |
||
| AME1..4 | Amplitude Modulation Sense Per Operator (On, Off) |
for every operator | |
| EBS1..4 | Envelope Genrator Bias Sense Per Operator |
for every operator | |
| KVS1..4 | Key Velocity Per Operator |
for every operator | |
| - | MONO | Monophonic / Polyphonic | |
| TRPS | Transpose | ||
| CHrs | Chorus On/Off | ||
| OSCILLATORS for every operator |
FIX | Ratio/Fixed Mode - On / Off | manual |
| FIXRG | Fixed Frequency Range (in Hertz) | ||
| FIXRM | LO / HI | ||
| CRS | Coarse Frequency | ||
| FINE | Fine Frequency | ||
| DET | Detune | ||
| ENVELOPE GENERATOR |
SHIFT | EG Shift - Off / 12 / 24 / 48 | manual |
| AR | Attack Rate | ||
| D1R | Decay 1 Rate | ||
| D1L | Decay 1 Level | ||
| D2R | Decay 2 Rate | ||
| RR | Release Rate | ||
| - | REV | Reverb - (0.. 9) | see chart |
| KBD SCALING | RATE | 0, 1, 2, 3 | |
| LEVEL | |||
| - | OUT | ||
Reverb:
0: Reverb - Hall
1: Reverb - Room
2: Reverb - Plate
3: Delay
4: Delay - Left / Right
5: Stereo Echo
6: Distortion + Reverb
7: Distortion + Echo
8: Gate Reverb
9: Reverse Gate
YSEDITOR MANUAL
- Be sure to connect the MIDI ports in 2 directions:
  FB01 Midi Out ==> Atari Midi In
  FB01 Midi In ==> Atari Midi Out
  If you own a Midi Merger or Midi Patchbay (recommended!) you should
  also connect your Masterkeyboard Midi Out ==> FB01 Midi In.
- Use your mouse to click on buttons, drag voices, drag banks.
  Click anywhere. You will see what happens.
- Use the righthand mouse button to send a selected voice to the editbuffer
- Drag envelope graphics from one operator to another to copy EG parameters.
- Experiment with the buttons and sliders in the editor. Try using the right
  hand mouse button to click on the sliders and buttons and see what happens.
- Most of the bankmanager operations have a keyboard equivalent.
  L=load S=save T=transmit R=receive Y=system
  Also try <Delete>, <Insert>, <Clr/Home>, and the arrow buttons.
- It's possible to save banks/voices as Standard Midi File: simply enter
  ".MID" as file extender in the fileselector instead of the default preset
  extender for the choosen data type.
- The 10 functions keys actually have functions. Try !
- Control+p = Print out the voicelist
- Control+a = Some extra functions appear with a GEM menu bar. This makes it
  possible to make use of Desktop Accessories (.ACC)
- Hit HELP and this text will appear.