
|
concepts - sequencer - lcd display - edit steps - record realtime - recording from midi - step & gate length - play mode - quickresults - side notes - signal flow - download
Editing with surgical precision (p.12-19 manual)
Tip: the display is your biggest friend during the EDIT modes.
The audio feedback of the pitches can sometimes be very confusing.
EDIT mode can be engaged when the sequencer is not Playing.
When in any of the 3 Edit modes (pitch, step, gate), the following buttons can always be used:| Buttons | Action |
Hold SHIFT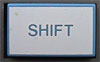 |
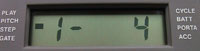 holding down SHIFT shows the current Measure (also called Bar) number holding down SHIFT shows the current Measure (also called Bar) number(here: Measure number 4) To switch to another Measure number: - keep holding SHIFT, press the Measure number [1..0] + ENTER |
| Press CHANNEL | Toggle Channel 1 or 2 |
| STEP FWD | The Note data that was shown on the display will now sound and the next Note data will be displayed. If you added portamento you will hear it. Display shows "----" after the last note. You will not hear an audible notification when you cross over to the next Measure. |
| STEP BACK | The Note that will be shown on the display will sound. So pressing FWD and BACK in succession, the same pitch will sound. Portamento will not be played. After pressing BACK on the very first Note in a Channel again, nothing will happen. If you cross the point to the previous Measure, two beeps will sound first before the Note sounds, which will be the last note of the previous Measure. |
| MEAS FWD/BACK | Jump to the first note of a Measure. You can check the total STEP length of a Measure in Play Mode. |
Edit Notes
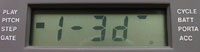 |
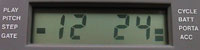
1 = channel number (1 or 2) - = octave transpose (here: normal) 3 = octave d = note - = indicates white or black key (here: black key) |
| Possibilities | Take these steps |
| Entering Notes | Enter the notes one by one using the keyboard or an external keyboard. Use the TRANSPOSE buttons to shift the internal keyboard. - The internal keyboard ranges from 1F..6C - An external keyboard can reach 1C..6C (lower Notes will not sound, higher Notes are automatically corrected to 6C) There are 2 possibilities when entering notes: 1. If the display shows "----" (=beyond last step, no more Notes): - a new Note is added using the defaut settings for STEP=24 ( 2. If you already have entered Notes and the display shows the 'current' Note: - you can edit the PITCH, STEP and GATE settings for this Note. - if you press a Note on the keyboard, the PITCH changes, but the STEP and GATE settings do not change. - when you release the Note key, the next Note shows (beware: all the notes with GATE=0 will be skipped!). |
| Deleting Notes | Delete the note displayed: - hold down the SHIFT button and press DEL STEP followed by ENTER. - release the SHIFT button. Beware: When the deleted Note is the last Note of a Measure, the "next Measure" marker is also lost. |
| Inserting Notes | Insert notes (the currently displayed note shifts to the right): - hold down SHIFT and press INS STEP. - release the SHIFT button. - Insert mode is now "on". - press the notes one by one (default STEP=24, GATE=12), - press [ENTER] to leave the "insert note" mode. - edit the Note properties afterwards. |
| STEP FWD | Beware: rest Notes (GATE=0) are skipped, because the PITCH of these notes have no meaning. |
| STEP BACK | However, the PITCH of rest Notes are shown AND played and can be edited during STEP BACK. |
Edit STEP
 |
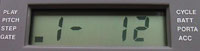
1 = channel number (1 or 2) 2 = currenly selected default GATE time (here: 2 NON LEG) space 24 = current note STEP time (here: 24) PORTA and ACCENT on (shown only in EDIT STEP) |
| Buttons | Action | ||||||||||||
| GATE key [0..4] | Sets the default GATE time for a note, which will be used when you are going to edit the STEP TIME of that note. GATE times work as follows:
For the exact GATE times per STEP, see the page Step & gate length. The display does not show the current note GATE time, because you can fine-tune the GATE time much more precise, than just one of the 5 fast GATE settings [0..4]. In that case, for instance "2" would never show the right amount of GATE time. See "Edit Gate" below. |
||||||||||||
| PORTA / ACC | Toggle Portamento-from-previous-note on/off Toggle Accent on/off - see "play mode" for system settings for Accent |
||||||||||||
| hold STEP key + ENTER or BAR |
 Enter course STEP and GATE time. - ENTER enters the selected STEP, the selected GATE above and proceeds to the next note. - BAR enters a dotted note (STEP and GATE length x 1,5) and proceeds to the next note. - you can not use a dotted - for the exact dotted times, again see the page Step & gate length. 1 Bar in 4/4 containing four 48 STEP notes ( Syncing to other Roland x0x DIN-sync gear
|
||||||||||||
| press Number key [1..0] and press ENTER |
Enter fine STEP time. - minimum 1, maximum 239 - 0 gives four beeps (error) - any number above 239 gives 239 - ENTER also moves to the next note |
Edit GATE
 |
1 = channel number (1 or 2) - = has no meaning here space 12 = shows the exact GATE time of the note (here: 12) |
| Buttons | Action |
| Number key [1..0] + ENTER |
Enter fine GATE time. - minimum 1, maximum 239 - 0 means a "Rest" note - any number above 239 gives 239 - any number above the current Note STEP time will be corrected to the current STEP time minus 1. - ENTER also moves to the next Note - when you change the STEP time to a lower number, the GATE time also changes to the same number minus 1. |
Measures or BARs?
On the panel of the MC-202 you can read "MEAS" and "BAR". These two words refer to the same thing.
Measure markers can be set at any Note location. When you do, the next Note will be in the next Measure.
You are not obliged to set Measure markers, but when you do, there are some benefits:
- quick navigation through a Channel
- copy and delete whole Measures
- check the STEP-length of each Measure
There is also a drawback:
- Bar markers can be set, but not be "unset", like you can with PORTA and ACC. It is not a toggle key.
- to delete a Bar marker, you actually have to delete the Note that carries the "new Bar" marker, which is the last Note of a Measure.
You then re-insert the same note.
Edit Measures
| Insert Measure marker | Go to the last Note that has to be part of the current Measure. - Press and hold BAR. The new Measure marker is placed after the current Note. - the new Measure number is shown at the right side of the display. - release the BAR key, the MC-202 beeps and proceeds to show the first Note of the new Measure. |
| Delete Measure marker | You can not erase the Measure marker, it is not an on/off switch. - the Measure marker can only be erased by deleting the last Note of the previous Measure. - this Note can easily be found, when you press STEP BACK. - when you hear a double beep, you have crossed over to the last Note of the previous Measure. - first, write down the properties of the Note (PITCH, STEP, GATE and PORTA, ACCENT). - erase that Note to get rid of the Measure marker and then reinsert the same Note properties. Pressing BAR on the very first note of a Channel gives 3 error beeps. - because every Channel already starts with Measure #1 by default. You can have totaly different Measure points in both of the Channels. Copying/deleting Measures in one Channel will have no effect on the notes or on the Measures of the other Channel. |
| Copying Measures | Hold SHIFT and press MEAS COPY to copy the remainder (including the current Note) of the current Measure to the end of the Channel. So make sure you're looking at the first note of a Measure if you want to copy the whole Measure. When you haven't set any Measures yet, the whole sequence, starting from the current Note, will be copied. An 'new Measure' marker is automatically added between both Measures and at the end of the Channel. |
| Deleting Measures | To delete all remaining notes of a Measure, including the currently displayed Note: - hold down SHIFT, press DEL MEAS and hit ENTER - to delete remaining Measures to the right: keep pressing ENTER - to stop deleting, release the blue SHIFT button |
| MEAS FWD | Jump to the first note of teh previous Measure. |
| MEAS BACK | Jump to the next note of teh previous Measure. |
| You can check the total STEP length of a Measure in Play Mode. |
Starting the song from a specific Measure number
- go to PLAY mode
- hold down SHIFT
- press the Measure number and ENTER - don't forget the ENTER
- release SHIFT
- press the blue CONT button (the START button always starts from Bar 1)