
|
Programming the Roland TB-303
| start | | | Sequencer | | | Sound | | | Software: app - manual - policy - about | | |
manual
The app is based on the answer to I discovered a great Pattern in the TB-303, and I want to study its sequence - how? in the "quick results"-page. The answer suggests you download a sequencer sheet to write the Pattern down. When you have gone through the process of noting the Triplets, the Time and the Pitch data on a sheet of paper, you are totally ready for the app. You can regard the app as a digital Pattern sheet, with the addition of a digital Track sheet.
![]() Most of the app is self explanatory, please investigate yourself first. Tooltips are presented on most icons. Unfortunately, this does not work on a touch screen computer, like a tablet.
Most of the app is self explanatory, please investigate yourself first. Tooltips are presented on most icons. Unfortunately, this does not work on a touch screen computer, like a tablet.
The app consists of only 4 pages:
1. a start page, listing all the users
2. an overview page with the contents of all the Pattern Groups in the tb303
3. a digital Pattern sheet
4. a digital Track sheet
1. start
You see the usernames of people that are using the app. Click on a username to examine their Patterns and Tracks.
2. pattern groups
When you want to save your own Patterns and Tracks, you have to log in first. You can log off at any time by clicking on the "log off" link in the upper right corner of the screen.
The Pattern Groups screen gives you an overview of the 4 Pattern Groups and 7 Tracks in your tb303.
Set
When you own a second tb303, you just create a new Set.
You can rename the Set by clicking "rename".
When you have only one set, you can not delete it.
Pattern Group
The way the Patterns and Tracks are distributed on the screen works the same as the tb303, so every Pattern Group contains 16 Patterns and 2 Tracks, except for Pattern Group number IV, which has only 1 Track.
You can rename any of the 4 Pattern Groups by clicking ![]()
- The design of the Pattern Edit icon represent the state of the Pattern:
| for the Pattern owner... | viewer can open this Pattern | |
| empty Pattern | no | |
| unfinished Pattern | no | |
| finished Pattern | yes | |
| - The icons in a Pattern | |||
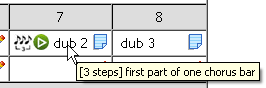 |
: | triplet pattern | |
| : | play mp3 | ||
| "dub 2" | : | pattern name | |
| tooltip | : | step numbers and description | |
| : | edit/view the pattern |
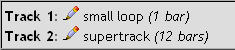
Track
Every Pattern Group has it's own Tracks.
You can edit each Track by clicking ![]()
If the Track has not been named, the name shows "(noname)".
Next to the Track name you see the number of Bars the Track consists of.
3. pattern
By clicking on a Pattern Edit icon, you can view or change the Pattern. When you have tried writing down a Pattern using a piece of paper, the workings of this page should be clear to you.
Give the Pattern a name and a description (e.g. the preferred tempo, cutoff, resonance etc). You can also upload an mp3 of the Pattern.
Choose if you want to start by entering the pitches or by entering the timing. It's arbitrary. Let's say you go top-down.
1 - TRIPLETS: Select a normal or a triplet Pattern and press "Reset TIME".
> Remember that changing the Pattern to "triplets" or to "normal" (similar to pressing the "PATTERN CLEAR" button on the tb303) clears the Timing data. The pitch data is retained, just like in the tb303.
>
"Normal (4/4)" gives 16 possible steps. However, "Triplets" gives 15 possible steps, in stead of the 12 steps you would get from the tb303. This enables you to use all 15 steps for a triplet Pattern without much hassle.
2 - TIME: Enter the Time data by selecting the radio button for each step.
>
Step 1 is initially selected as the "last step". "Last step" saves the Pattern length. The "last step" marker should follow your clicks as you enter the Time data. If it does not, don't forget to set it. You tend to forget to set the last step, when the last step is a rest (the default setting).
> When a triplet Pattern does not contain 3, 6, 9, 12 or 15 steps, you will get a warning that this Pattern will not sync to a 4/4 pattern. This is important for when you plan to sync the tb303 to e.g. a tr606.
> Please check twice before pressing Save.
3 - PITCH: Enter the Pitches and press the "Save PITCHES" button.
>
You can always enter the pitch properties in a second run (transpose, accent, slide).
> The pitches are automatically glued to the ![]() steps, regardless if you entered the pitches or the timing first.
steps, regardless if you entered the pitches or the timing first.
> When "Down" and "Up" are lit, make note anyway. These tb303 errors will automatically be corrected in the "pitch" row in the TIME table, see below.
When you have finished entering the PITCH and TIME of the Pattern, the "pitch" row in the TIME table shows "What you hear", which means:
-
the high-C transposed Down will sound like a low-C. In this case you will see the low-C in the "pitch" row.
- a Transpose Up and Down (both leds on) will result in Transpose Down.
| E | : | the pitch |
| : | transpose down / up | |
| E | : | slide to the next pitch |
| E | : | accented pitch |
When entering the Pattern is completed, return to the pattern group page by clicking on the "pattern group" link in the navigation path (top of the page).
4. track
You can build the Track at any time, but it's more logical to create the needed Patterns first.
| From top to botton | |
| > | The Track starts with showing the associated Pattern Group. These are the Patterns you can select for this Track.
All the Track options (Track name, Bar Pattern, DC, DS...), are saved using the diskette button |
| > | Second, you can change the Track name |
| > | Third, you set the number of Bars to show on each row. This will make sense after you have entered a few Bars into the Track. The setting is memorized with every Track. |
| > | Next you can create the first Bar by clicking |
| > | Next you can enter the DC and DS for the Track. You need at least 2 Bars to be able to set DC or DS. |
| > | And finally you can create Text Markers like "intro", "verse", "chorus", "bridge", etc. |
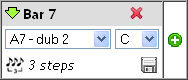
| - 1st row | ||
| : | insert a new Bar before this Bar. All Bars including the current move right. | |
| Bar 7 | : | the Bar number |
| : | delete this Bar immediately (no confirmation) | |
| - 2nd row | ||
| A7 - dub 2 | : | Pattern number and name |
| C | : | the key of the Pattern |
| - 3rd row: optional information | ||
| : | this Bar has the D.S. sign | |
| : | triplet pattern | |
| 3 steps | : | number of steps in this Pattern. Not shown for unfinished Patterns |
| D.C. | : | this Bar has the D.C. sign |
| - after the last Bar that is part of the Bars in a marker | ||
| : | add a Bar to the right. The tb303 does not support this. Use INS on the next Bar instead. | |
Text markers
The usage of text markers is not obligatory.
They can be inserted, renamed and deleted without destructing the Bars.
The tb303 will never feel like "My First Sony", but this app will make things easier.
Enjoy.